RHCSA/EL10 - bootloader, initramfs, kernel arguments, resetting the root password, oh my
RHCSA study part 1: the bootloader, initramfs, and the first problem! Let’s reset a root password! Don’t worry. We won’t get too distracted… I promise…
The lab environment used in this post consists of GenericCloud AlmaLinux 10 machine(s) running on a Proxmox VE cluster.
For info about the environment, see the build log.
To get your hands on the GenericCloud base images, go to repo.almalinux.org.
To set up a Proxmox VE template from a GenericCloud base image as I’ve done here, see this post.
Background - quick intro
Legend has it that the first problem you face on the RHCSA is actually getting into a system.. by resetting the root password.
Well, that’s fine and dandy, but all this editing GRUB.. what does it do? Haha. I’m glad you asked!
The Linux boot process (on a modern/UEFI system) goes something like this:
The system POSTs, and the firmware reads the EFI system partition (ESP, typically fat32 /boot/efi), looking for the bootloader.
The system finds the EFI binary for the bootloader, and the firmware hands off to it (e.g., GRUB, systemd-boot)
GRUB reads the GRUB configuration (/boot/grub2/grub.cfg) from the fat32 /boot partition and (usually) presents the menu.
GRUB loads the selected kernel and initramfs from /boot into memory.
GRUB passes cmdline args to the kernel, and launches the kernel.
The kernel decompresses itself, initializes basic hardware (enough to mount the initramfs).
Kernel mounts the initramfs (bootstrap root filesystem) in RAM, executes /init, PID 1, in the initramfs (not to be confused with the init system)
You can boot without the initramfs. See this enterprising Gentoo user doing just that. This requires all the necessary drivers for boot (e.g., storage drivers, filesystem drivers) to be built in to the kernel (rather than as modules loaded in the initramfs stage). You may have some difficulty doing this if your root partition is encrypted.
init scripts in the initramfs load storage drivers, deal with LVM/mdadm/LUKS (everything you need to mount the root filesystem).
initramfs init scripts mount the root filesystem.
Once root fs is accessible, the system switches to the real init system (dracut init, PID 1 during the initramfs phase, re-execs “into” systemd)
systemd reads the default target, and starts services in dependency order
Once the target (e.g., multiuser or graphical) is reached, getty or your display manager start
The bootloader
First, what’s a bootloader? I’m glad you asked!
A bootloader is a “startup program” that takes over from a system’s firmware (BIOS, EFI, openboot, or what have you) and loads the kernel.
In EL-land (and most* of Linux-land today), we use GNU GRUB (the GRand Unified Bootloader), the reference implementation of the FSF’s Multiboot Specification.
*exception - systemd-boot is getting popular
How does GRUB work? Well, it depends. On an EFI system (which should be just about everything nowadays), it’s simple!
The EFI loads /efi/os/grubx64.efi, the GRUB EFI binary, from the EFI system partition
grubx64.efi, an EFI binary containing the core bits of GRUB - just enough “stuff” to find the boot partition and load the rest of itself - finds /boot and starts loading modules files from /boot (e.g., the most important module, /boot/grub/i386-pc/normal.mod).
code in normal.mod, loaded by grubx64.efi, parses /boot/grub/grub.cfg and loads other modules, shows the menu.
GRUB boots the system, loading the kernel into memory, then initializing the kernel with any configured arguments.
If you’re using Secure Boot, rather than immediately loading grubx64.efi, you’ll first boot an EFI shim.. but we’re not going to get into that now.
On a BIOS system, there are a few more limitations GRUB has to deal with that make it more complicated.
BIOS systems boot the first 440 bytes of the MBR. The problem is that 440 bytes is nowhere near enough to fit the code to do things like read a filesystem… So, GRUB puts a “stage 1” payload in those first 440 bytes - just enough to find and load the rest of the bootloader. This first stage is basically just a pointer to the 64-bit logical block address (LBA) for a chainloader (diskboot.img) that can finish loading the rest of the “core” bits of GRUB (core.img).
So, the boot process goes something like this:
The system boots the first 440 bytes of the MBR (GRUB stage 1)
GRUB stage 1 starts diskboot.img
diskboot.img then loads the rest of GRUB - core.img - typically from the empty sectors between the MBR and first partition.
GRUB core.img finds /boot/ and loads /boot/grub/i386-pc/normal.mod, shows the menu.
GRUB boots the system, loading the kernel into memory, then initializing the kernel with any configured arguments.
Either way, once GRUB has loaded the kernel, it ‘hands off’ to the initramfs stage of boot.
Recent versions of EL10 implement the Boot Loader Specification (BLS) so the GRUB configuration is dynamically assembled by the system from ‘modules’ in /boot/loader/entries rather than being ‘static’ in the /boot/grub2/grub.cfg.
[wporter@rhcsa0 ~]$ sudo cat /boot/grub2/grub.cfg | head -n 5## DO NOT EDIT THIS FILE## It is automatically generated by grub2-mkconfig using templates# from /etc/grub.d and settings from /etc/default/grub[wporter@rhcsa0 ~]$ sudo ls /etc/grub.d
00_header 08_fallback_counting 12_menu_auto_hide 20_ppc_terminfo 30_uefi-firmware 41_custom
00_tuned 10_linux 14_menu_show_once 25_bli 35_fwupd README
01_users 10_reset_boot_success 20_linux_xen 30_os-prober 40_custom
[wporter@rhcsa0 ~]$ sudo cat /etc/default/grub
GRUB_TIMEOUT=10GRUB_TIMEOUT_STYLE=menu
GRUB_DISTRIBUTOR="$(sed 's, release .*$,,g' /etc/system-release)"GRUB_DEFAULT=saved
GRUB_DISABLE_SUBMENU=trueGRUB_TERMINAL_OUTPUT="console"GRUB_CMDLINE_LINUX="console=tty0 console=ttyS0,115200n8 no_timer_check biosdevname=0 net.ifnames=0"GRUB_DISABLE_RECOVERY="true"GRUB_ENABLE_BLSCFG=true[wporter@rhcsa0 ~]$ sudo cat /boot/loader/entries/3ecb26dceaf3416f95b3b3ca09b940c1-6.12.0-124.8.1.el10_1.x86_64.conf
title AlmaLinux (6.12.0-124.8.1.el10_1.x86_64) 10.1 (Heliotrope Lion)version 6.12.0-124.8.1.el10_1.x86_64
linux /vmlinuz-6.12.0-124.8.1.el10_1.x86_64
initrd /initramfs-6.12.0-124.8.1.el10_1.x86_64.img
options root=UUID=99bf1bf0-97c8-472e-9e64-fc4fee387b2b ro console=tty0 console=ttyS0,115200n8 no_timer_check biosdevname=0 net.ifnames=0grub_users $grub_usersgrub_arg --unrestricted
grub_class almalinux
The initramfs
You should know what this is, but we don’t need to go too crazy. The init RAM filesystem, or initramfs, is a lightweight tmpfs mounted at boot and used to bootstrap the system (e.g., load initial kernel modules required to handle mounting the real root partition).
It’s a compact system image used to initialize the real root partition, stored as a cpio archive that’s loaded into RAM and mounted as tmpfs at boot time (so it’s lightweight, and uncomplicated for the kernel to load). The initramfs is disposable, and is effectively flushed away once the system has switched to the real root filesystem.
This type of bootstrapping filesystem is not strictly necessary but is standard on most modern (highly generalized) Linux distributions/installs to handle things like disk encryption or disk controller drivers.
You may have also heard about the “initrd” before. This is an older method of initializing the system with a “smaller” system (similarly to the initramfs). It’s fallen out of favor because it uses more memory and is a little more complicated than an initramfs (by virtue of using a block device, rather than a tmpfs).
In contrast to the initramfs, which is a simple archive that’s mounted as a tmpfs, an initrd is a block device image (e.g., /boot/initrd.img), typically formatted ext2, that’s loaded into RAM and mounted as a block device at boot time. The initrd then needs to be unmounted once the system has pivoted to the real root partition.
“initrd” and “initramfs” are often used interchangeably (e.g., rd.break tells the system to break once it boots the initrd, but the name hasn’t been changed for modern systems with an initramfs) but these are two distinct concepts.
dracut
dracut is a tool for creating initramfs boot images.
It’s been widely adopted, being used by the Enterprise Linux family, Fedora, Gentoo, VoidLinux, openSUSE and SLES, Ubuntu (soon?), Debian (and others). Its main features are its modularity and operational simplicity. The primary benefit of dracut is that it can often figure out what you need for an initramfs (build you a working image) without any configuration or user input.
Additionally, in contrast to other initramfs systems, which typically rely on shell scripts to bring the system up or detect when a condition is met, a dracut initramfs is event-driven - it works by watching for udev device nodes (e.g., for the root filesystem, as a signal that the system is ready to boot). This helps dracut bring up a system more quickly.
dracut is configured by way of drop-in files in the /etc/dracut.conf.d directory. If you need to enable or omit a dracut module or kernel module, you’d do it through a file there.
In the below example, my system is configured to load the xen-netfront and xen-blkfront kernel modules at boot by the xen_pvhvm.conf drop-in.
For more info on the configuration of dracut, see dracut.conf(5). For the dracut documentation, see the dracut wiki.
[wporter@rhcsa0 ~]$ cat /etc/dracut.conf
# PUT YOUR CONFIG IN separate files
# in /etc/dracut.conf.d named "<name>.conf"
# SEE man dracut.conf(5) for options
[wporter@rhcsa0 ~]$ ls /etc/dracut.conf.d/
xen_pvhvm.conf
[wporter@rhcsa0 ~]$ cat /etc/dracut.conf.d/xen_pvhvm.conf
add_drivers+=" xen-netfront xen-blkfront "
Inspecting the initramfs
On EL-type platforms, use lsinitrd to inspect the contents of initramfs cpio archives, or you can extract the archive with unmkinitramfs.
lsinitrd will enumerate the contained dracut modules, kernel modules, udev rules, keymaps, binaries, etc in the archive in a relatively human-readable format. Not super in-scope here.. but there ya go:
[wporter@rhcsa0 ~]$ sudo lsinitrd
Image: /boot/initramfs-6.12.0-124.8.1.el10_1.x86_64.img: 55M
========================================================================
Early CPIO image
========================================================================
drwxr-xr-x   2 root     root            0 Aug 18  2025 .
-rw-r--r--   1 root     root            2 Aug 18  2025 early_cpio
drwxr-xr-x   2 root     root            0 Aug 18  2025 kernel
drwxr-xr-x   2 root     root            0 Aug 18  2025 kernel/x86
drwxr-xr-x   2 root     root            0 Aug 18  2025 kernel/x86/microcode
-rw-r--r--   1 root     root     18507776 Aug 18  2025 kernel/x86/microcode/GenuineIntel.bin
========================================================================
Version: dracut-107-3.el10

Arguments:  -f --kver '6.12.0-124.8.1.el10_1.x86_64'

dracut modules:
bash
systemd
fips
Bootloader arguments
If you have a short GRUB_TIMEOUT configured, you may not be able to get into the GRUB menu from a warm boot (while on physical hardware you may be able to hammer shift/escape, in a VM you might not be able to do this).
The GRUB_TIMEOUT is configured in /etc/default/grub:
To change the timeout, modify /etc/default/grub. In my case, I’m using sed to replace the line “GRUB_TIMEOUT=0” with “GRUB_TIMEOUT=10”. Adjust to suit; the cloud-init images I’m using start with a timeout of 0.
sudo sed 's/^GRUB_TIMEOUT=0$/GRUB_TIMEOUT=10/g' -i /etc/default/grub
Then, regenerate your GRUB configuration on disk from the file:
# this is the same thing as grub2-mkconfig# w/o specifying -o.. just being explicitsudo grub2-mkconfig -o /boot/grub2/grub.cfg
Grubby
grubby is a tool for working with the bootloader (getting and setting configuration strings without needing to manually edit grub2 config files). While Red Hat doesn’t have a nice overview article, Oracle does, and Oracle Linux is basically RHEL.
In my experience, my main use for grubby is interacting with kernel arguments. For example, to list installed kernels:
Boot Loader Specification & the various boot files in EL10
Let’s first very briefly discuss the Boot Loader Specification, or “BLS”. This is a standard for boot entry configuration files under /boot/loader/entries that can be read by any compliant bootloader.
As you can see, each boot/loader/entry defines the title, kernel, path to the initrd/initramfs image, and kernel parameters.
Here’s an older example (by old, I mean old.. RHEL 5) showing two bootloader entries configured in /boot/grub/grub.conf instead. Source is the RHEL 5 documentation.
default=0 timeout=10 splashimage=(hd0,0)/grub/splash.xpm.gz hiddenmenu title Red Hat Enterprise Linux Server (2.6.18-2.el5PAE) root (hd0,0) kernel /boot/vmlinuz-2.6.18-2.el5PAE ro root=LABEL=/1 rhgb quiet initrd /boot/initrd-2.6.18-2.el5PAE.img# section to load Windows title Windows rootnoverify (hd0,0) chainloader +1
Because EL10 is compatible with the BLS, we can use the bootctl command for an overview of bootloaders.
[root@rhcsa0 entries]# bootctl
systemd-boot not installed in ESP.
System:
      Firmware: n/a (n/a)
 Firmware Arch: x64
   Secure Boot: disabled (setup)
  TPM2 Support: no
  Measured UKI: no
  Boot into FW: supported

Random Seed:
 System Token: not set
       Exists: no

Available Boot Loaders on ESP:
          ESP: /boot/efi (/dev/disk/by-partuuid/7d4c7346-5e62-4fb3-9fff-838e14c55c0b)
         File: ├─/EFI/BOOT/fbx64.efi
               └─/EFI/BOOT/BOOTX64.EFI

Boot Loaders Listed in EFI Variables:
        Title: AlmaLinux
           ID: 0x0003
       Status: active, boot-order
    Partition: /dev/disk/by-partuuid/7d4c7346-5e62-4fb3-9fff-838e14c55c0b
         File: └─/EFI/almalinux/shimx64.efi

Boot Loader Entries:
        $BOOT: /boot/efi (/dev/disk/by-partuuid/7d4c7346-5e62-4fb3-9fff-838e14c55c0b)
        token: almalinux

0 entries, no entry could be determined as default.
In the output of this bootctl command, you can see a few things of interest: first, the fallback boot loader (fbx64.efi, BOOTX64.efi), and that we’re actually booting an EFI shim (for Secure Boot) rather than GRUB’s EFI binary grubx64.efi (the shim will chainload GRUB).
Finally, you may have noticed that we have “0 entries” - this is because bootctl is primarily a tool for interacting with systemd-boot, not grub2.. but, since systemd-boot and GRUB both use the BLS, it works with GRUB, too.
If you inspect your /boot/efi, we can see a few more EFI binaries:
[root@rhcsa0 entries]# ls /boot/efi/EFI/almalinux/
BOOTX64.CSV  grub.cfg  grubx64.efi  mmx64.efi  shim.efi  shimx64-almalinux.efi  shimx64.efi
[root@rhcsa0 entries]# ls /boot/efi/EFI/BOOT
BOOTX64.EFI  fbx64.efi
BOOTX64.CSV - tells firmware how to restore the boot entry if lost
grub.cfg - config for the GRUB EFI binary
grubx64.efi - GRUB EFI binary
mmx64.efi - MOK manager binary (for managing your own Secure Boot keys)
shim.efi, shimx64.efi - EFI shim binaries for Secure Boot
These are the same file - their sha256sum matches.
BOOTX64.EFI - this is the fallback bootloader. The EFI will look for this file if it doesn’t find a boot entry saved to NVRAM.
On the Alma image I’m using, this is another copy of shimx64.efi.
fbx64.efi - EFI fallback binary used to restore boot entries if they’re lost.
As mentioned above, the three of shim.efi, shimx64.efi, and BOOTX64.efi are the same file, and while shimx64-almalinux.efi is distributed with the same package, it differs.
If we inspect the two EFI binaries with pesign, we can see that shimx64.efi is the upstream shim, signed by Microsoft, and shimx64-almalinux.efi is AlmaLinux’s shim:
[root@rhcsa0 entries]# pesign -S -i /boot/efi/EFI/almalinux/shimx64.efi
---------------------------------------------
certificate address is 0x7f82aee4b7b8
Content was not encrypted.
Content is detached; signature cannot be verified.
The signer's common name is Microsoft Windows UEFI Driver Publisher
No signer email address.
No signing time included.
There were certs or crls included.
---------------------------------------------
[root@rhcsa0 entries]# pesign -S -i /boot/efi/EFI/almalinux/shimx64-almalinux.efi
---------------------------------------------
certificate address is 0x7fd5ddf3d7b8
Content was not encrypted.
Content is detached; signature cannot be verified.
The signer's common name is AlmaLinux Secure Boot Signing
The signer's email address is security@almalinux.org
Signing time: Mon Feb 16, 2026
There were certs or crls included.
---------------------------------------------
So, for whatever reason, this system is booting the plain Microsoft shim. I’m not sure why, and, in my case, Secure Boot is off anyway.. so this is way off topic. Secure Boot and EFI madness is definitely deserving of its own post. Moving on..
GRUB BLS shim, grub2-mkconfig
The bootloader configuration on our EL10 box is /boot/grub2/grub.cfg. However, GRUB doesn’t read this directly - GRUB, at boot, reads /boot/efi/EFI/almalinux/grub.cfg, which is a BLS shim that points to $dev/grub2/grub.cfg (/boot/grub2/grub.cfg). /boot/grub2/grub.cfg itself is dynamically generated by scripts in /etc/grub.d:
And I won’t dump grub.cfg here, since it’s a massive shell script, but here’s the first few lines telling you to NOT edit this file as it’s generated.
[root@rhcsa0 ~]# cat /boot/grub2/grub.cfg | head -n 5
#
# DO NOT EDIT THIS FILE
#
# It is automatically generated by grub2-mkconfig using templates
# from /etc/grub.d and settings from /etc/default/grub
If you’ve updated a GRUB script or parameter, you can rebuild the grub.cfg with grub2-mkconfig:
Anyway, finally! We’re at the one thing we needed to do. Let’s reset a root password.
It doesn’t matter if the root account was disabled, and you can log in on the console even if root is blocked from signing in via SSH (obviously, you’ll need console access to get at GRUB, so this shouldn’t be a problem)..
Restart the system.
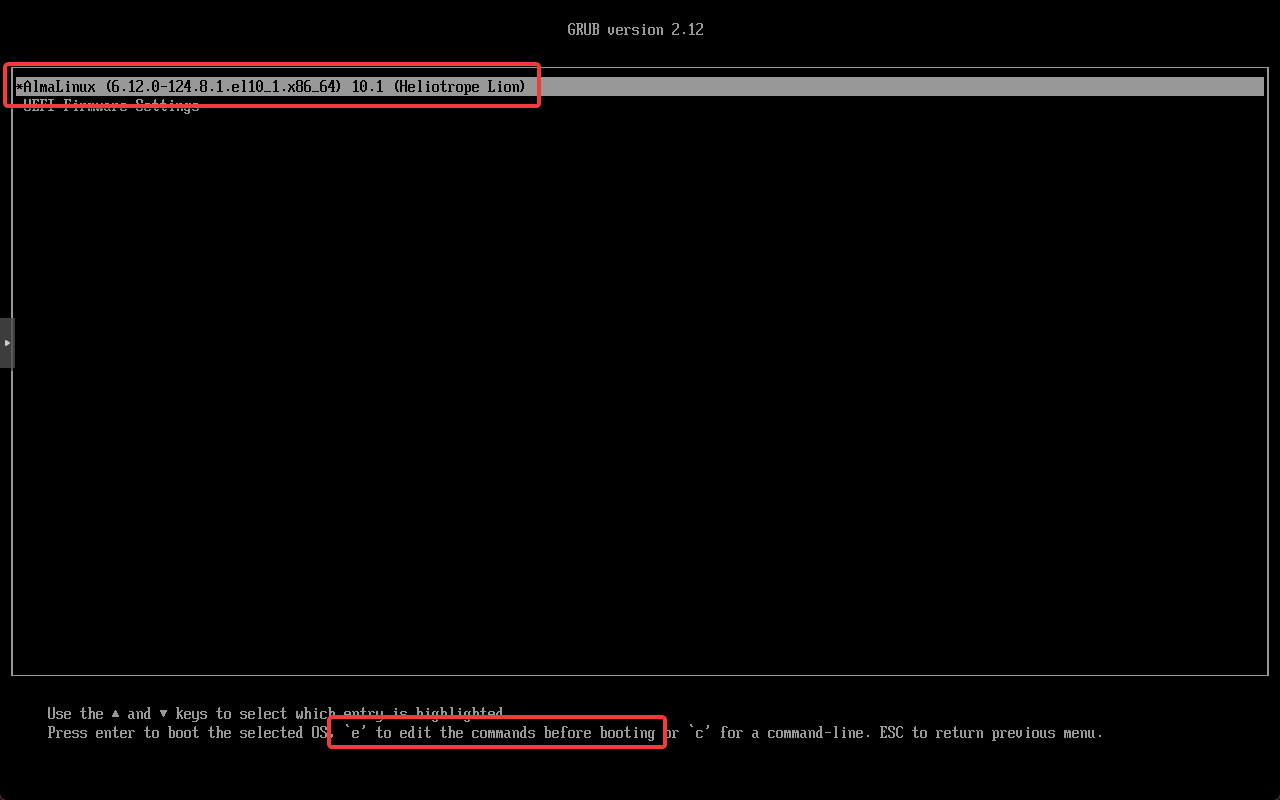
As the system boots, rapidly press ESC (EFI system, if no GRUB timeout is configured), hold Shift, or wait for the GRUB splash screen to appear.
Once the splash screen appears, press the up or down arrow key to cancel automatic boot.
Select a bootloader entry with the up and down arrow keys, then press “e” to edit the command list.
After pressing ’e’ on a boot entry, you’ll be taken to a different screen, and should see a list of GRUB commands. This is our boot entry itself. As you may have guessed, we can edit it here to make a (temporary) change to the boot process.
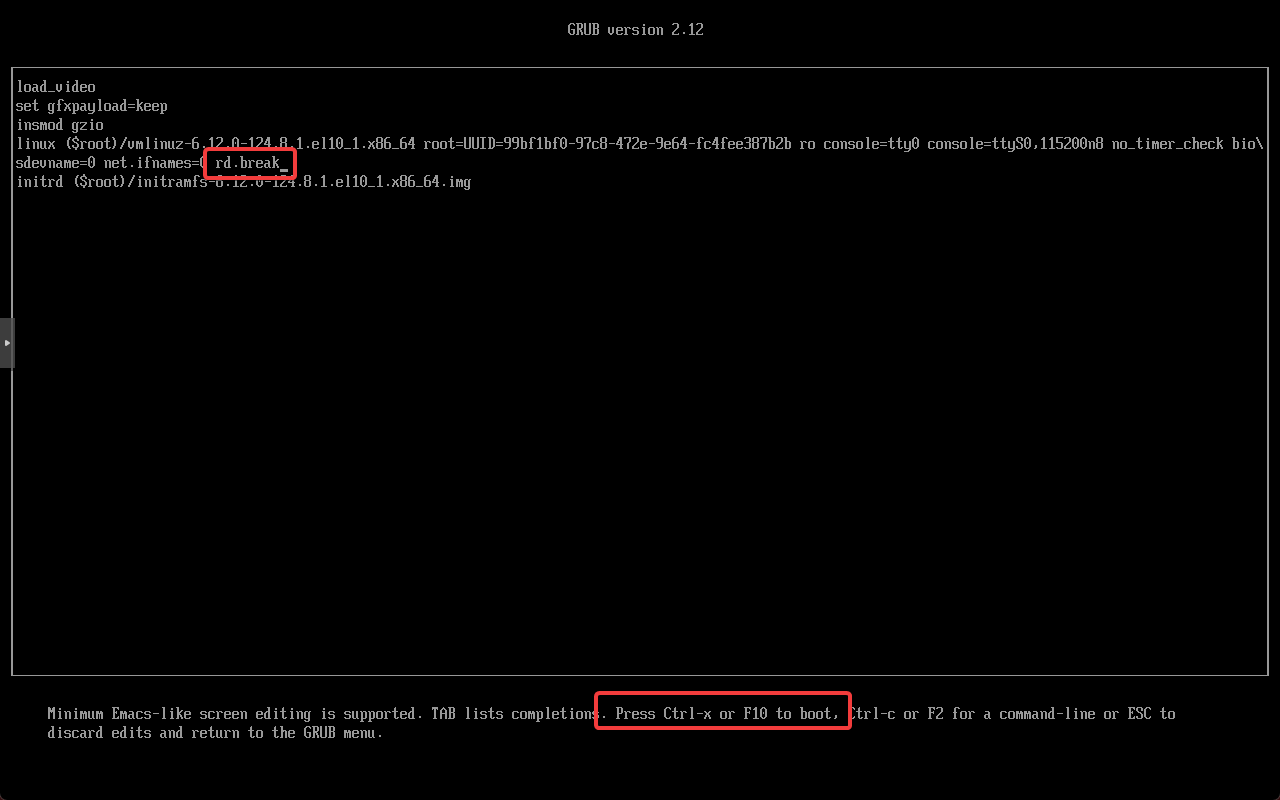
Move the cursor over to the line starting with “linux”.
We’ll need to tell the system to boot into single-user mode (rescue mode). Append “rd.break” to the linux line, then, press Ctrl and X or F10 to boot the system from the command list.
rd.break interrupts the boot process just before control is passed from the initrd (initramfs, initial ramdisk, whatever you may call it) to the root filesystem (after the dracut pre-pivot hooks have run and root filesystem has been found and mounted read-only at /sysroot) and drops you into a minimal emergency/maintenance shell in a dracutinitramfs. This is a single-user utility mode that we can access the disks from. You can use any other Linux system that can access the root filesystem of your EL box, chroot in, and change the password for root to do the same thing.
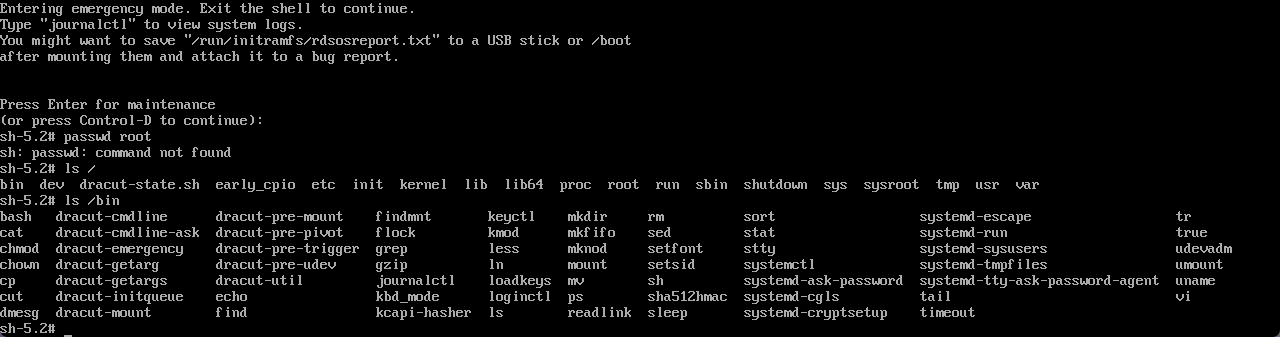
The system will boot in single-user mode. You should be dropped into an “emergency mode” shell. Hit Enter to get to the prompt.
As we’re in ’emergency mode’, the root filesystem hasn’t been mounted. We’re running from the initramfs, so we’ll be rather restricted (in terms of system utilities to choose from). For example, I can’t directly change the root password, and if I list my root directory, I’ll see the initramfs - not my main system’s /.
The real system is mounted under /sysroot. To illustrate that point, I can see my normal user’s home directory here - there’s no such thing as /home in the initramfs (see above image).
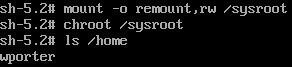
Right now, that root partition is read-only, and we’re not using it as root (so we can’t run commands from it). To fix that, let’s remount it read/write, and chroot to that directory so we can use its /bin and subdirectories as normal.
chroot just changes the apparent root directory for a process and its children. In this case, we’re using this to “switch” to the main OS’s root partition to get at system utilities and work on the correct files, but you’ll also see chroot in the context of chroot jails - once you chroot a process, it won’t be able to reference any path above the new root directory, so it can’t access the rest of the host filesystem. Anyway, in this scenario, you can think of a chroot as a basic container/namespace tool to let you switch into the “context” of a different image - but bear in mind that all it’s doing is changing the apparent root directory for our shell to the main root partition (from the initramfs).
mount -o remount,rw /sysroot
chroot /sysroot
To better illustrate what we just did with chroot, let’s get to the former /sysroot/home directory. Note how it’s now just /home from this shell.
Now we’ve essentially got the main root partition mounted, and we can work with utilities/files on it. In our case, all we need is passwd. Run the passwd command to set the root password.
Then, because this is an EL system with SELinux (out of scope for this post..) in place, we’ll have to relabel /etc/shadow, as it’s changed offline and its context is gone. We can’t (easily) do this from the initramfs with restorecon, since SELinux policy isn’t loaded, so we’ll need to touch /.autorelabel (/sysroot/.autorelabel, but we’re chroot‘ed in right now) to tell SELinux to relabel everything at the next boot.
But what if we don’t do that?
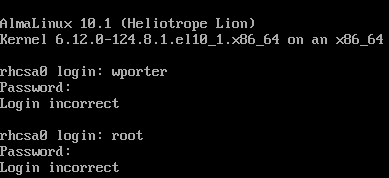
Because the SELinux context on /etc/shadow is wrong (completely gone) after running passwd from the initramfs, which doesn’t load SELinux:
SELinux will block everything that tries to read /etc/shadow and prevent any user from signing in, even if their password is right:
Anyway. Create that /.autorelabel file, type exit to exit the chroot environment and get back to your initramfs, then reboot.
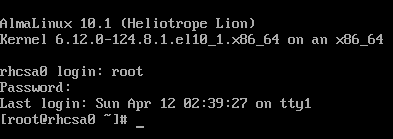
Once the system comes back up, log in with your newly reset root password.